
Microsoft Paint 3D
I led Paint 3D's UX design as part of an amazing multi-disciplinary team, researching and developing 3D interaction paradigms, sketching ideas, writing up interface specifications, iterating prototypes in Unity, and presenting to senior Microsoft stakeholders.
This app is currently live and rolling out to all Windows 10 users as part of the Creators update. It has received a very warm reception. See press coverage below and the video above:
https://www.engadget.com/2017/03/29/windows-10-creators-update-review/
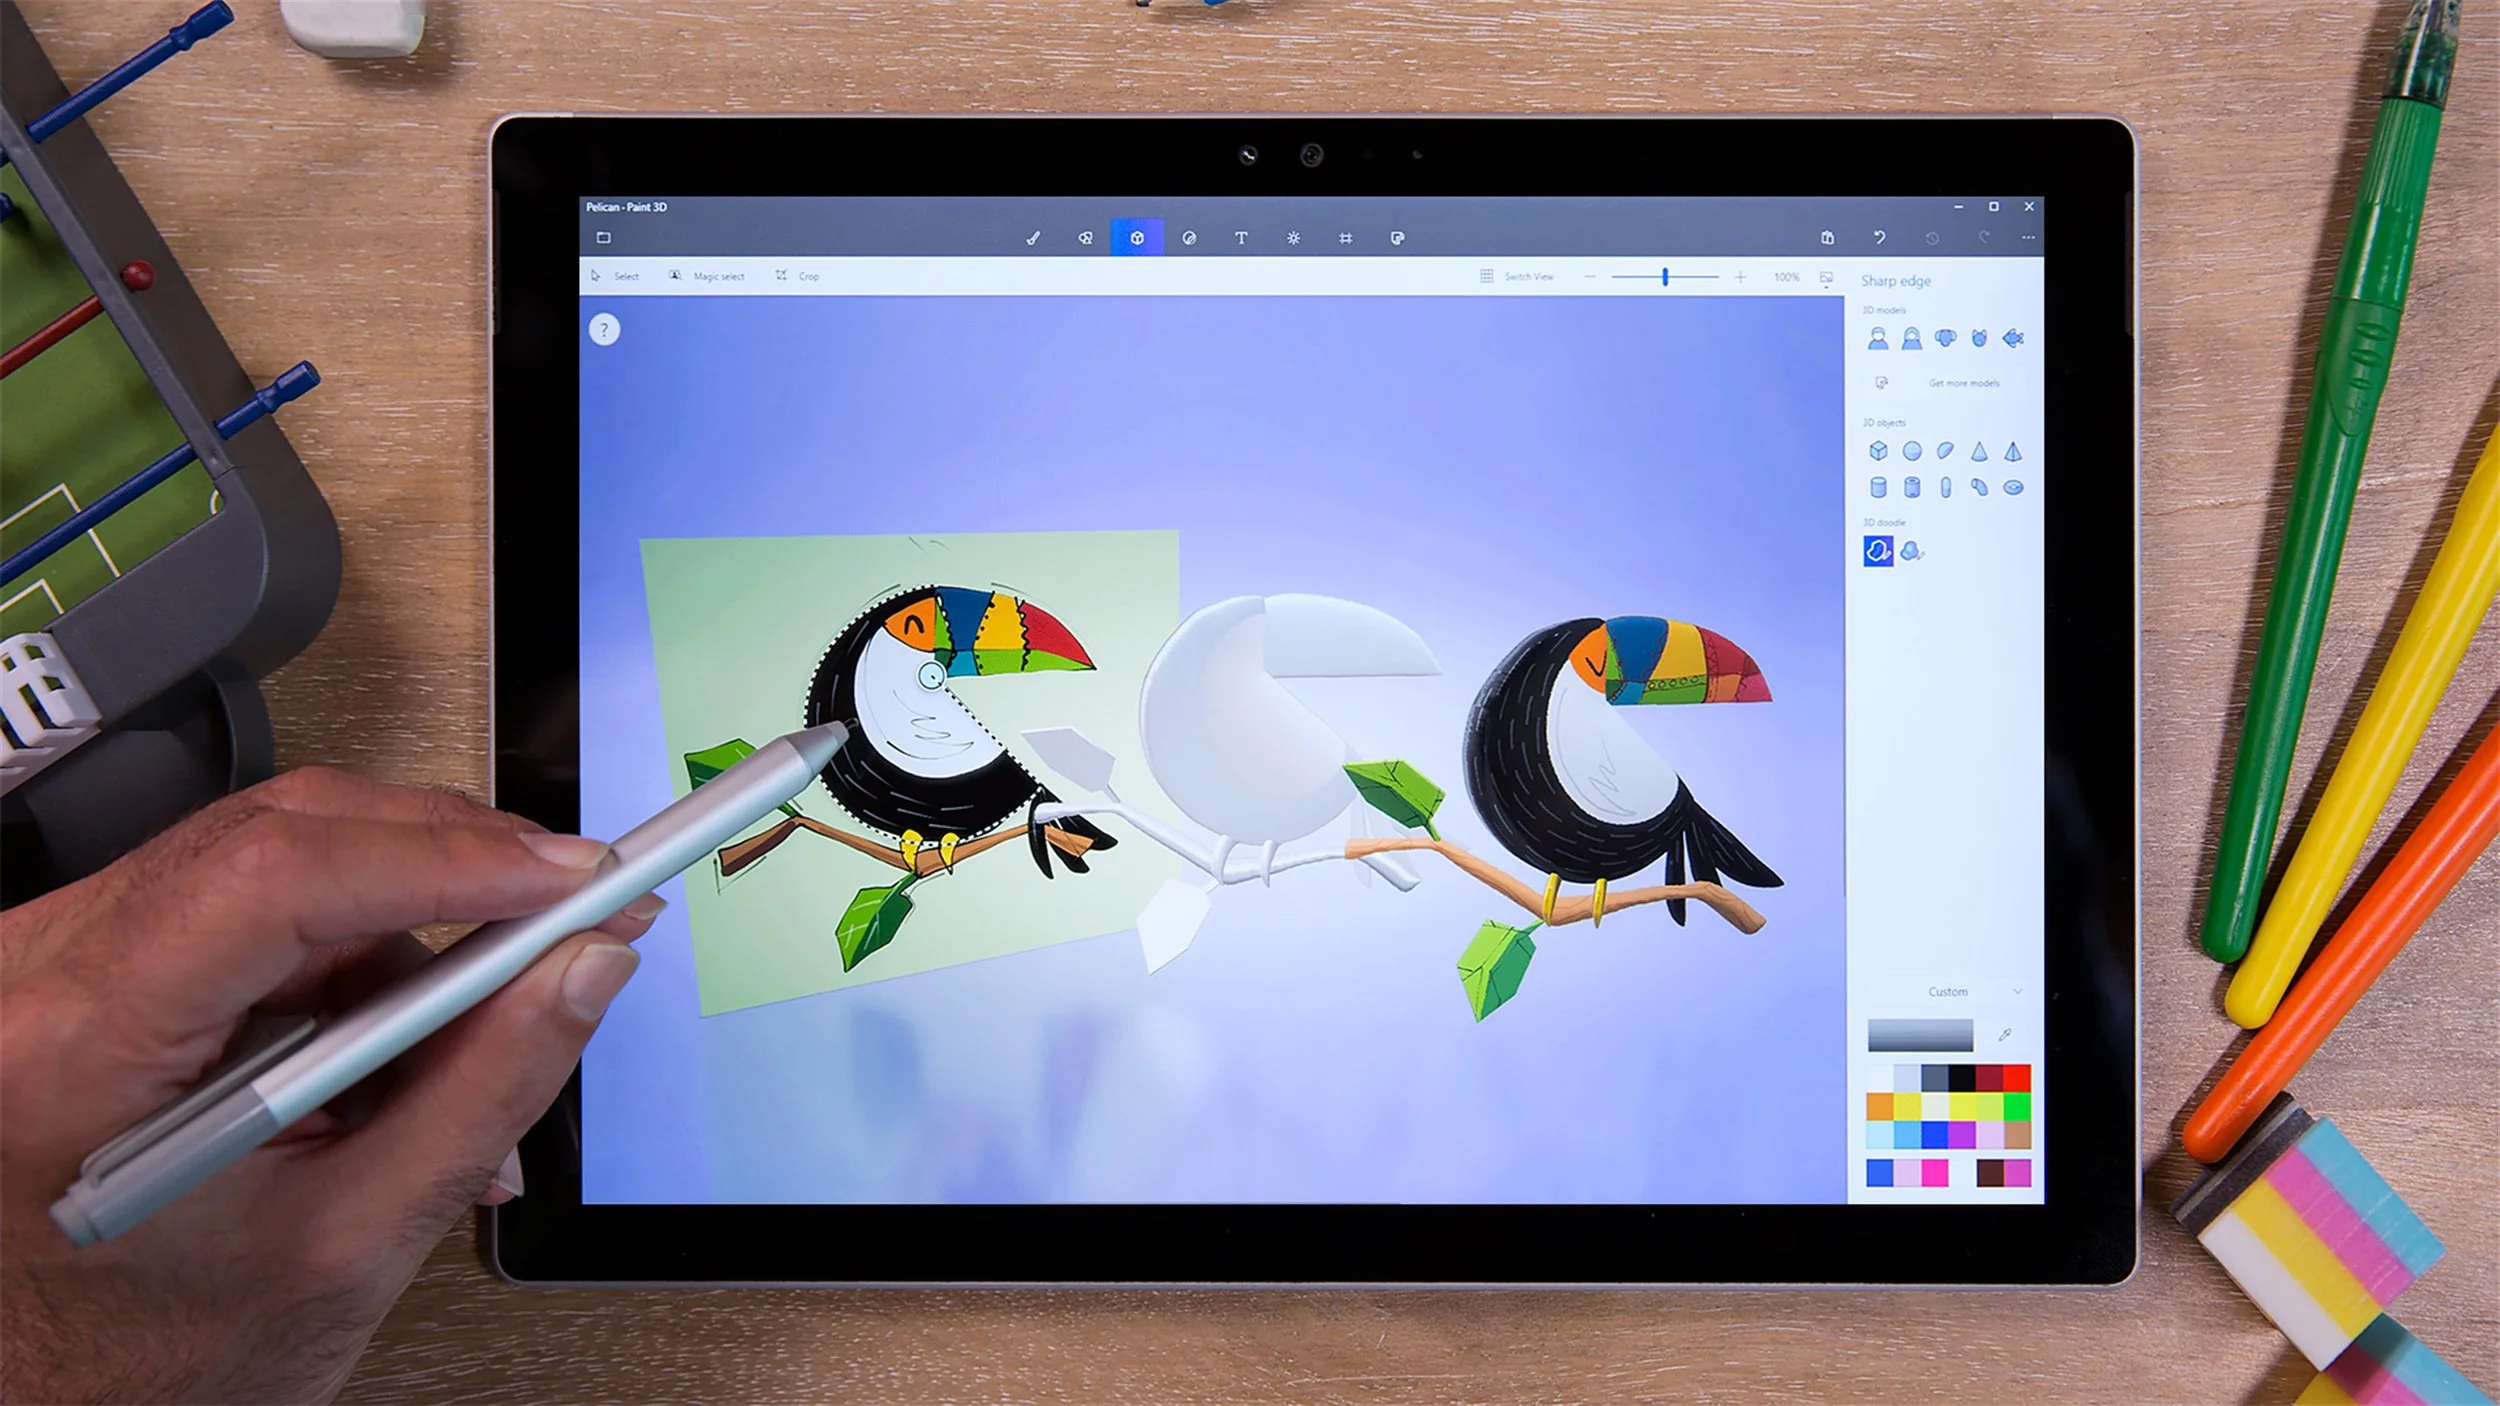
Paint 3D, an evolution of the classic Paint app in three dimensions, is the highlight of the Creators Update. ... I didn't think much of Paint 3D at first, but my mind changed the instant I overlaid a leafy texture on top of a 3D cat. That's the sort of thing you previously needed pricey and complex 3D-modeling software to do -- now it's a free part of Windows 10 that's simple enough for kids to use."
How could we re-imagine Microsoft Paint to introduce a new generation of users to 3D creation?
The original Paint shipped with Windows 1.0 in 1985, and for its users was their first experience of 2D computer image editing of any kind. For them, it defined interaction paradigms that still serve them to this day – from click-dragging to paint or create a rectangle, to selection manipulation and clipboard use.
Paint 3D had two jobs:
Introduce users to 3D creation and editing in the most fun, immediate and understandable way possible.
Completely re-imagine and update Paint's 2D features for the touch/pen-first environment of the Microsoft Surface and similar modern multi-modal devices.
This was a huge project to create, from scratch, a new app to replace and update one with well over 100 million existing active users.
Research
The project started with an extensive research phase, including a full review of the state of the art for 3D creation on desktop, tablet and phone.
During this process we explored a huge range of software from Autodesk's 3D iPad creation suite to experimental SIGGRAPH projects, from SketchUp to 3D creation games, from Hololens tools to desktop professional behemoths like Maya and 3D Studio.

The various different paradigms and levels of complexity were assessed and this framed the first decisions we'd have to make:
Free or fixed camera?
Single or multi-mode interaction for move/scale/rotate?
How do we mix the 2D canvas of paint with a 3D world with depth?
How can we sidestep 100% of 3D creation's specialist terminology to make it feel more accessible?
How do we make the app feel touch/pen first without mouse/keyboard users even noticing?
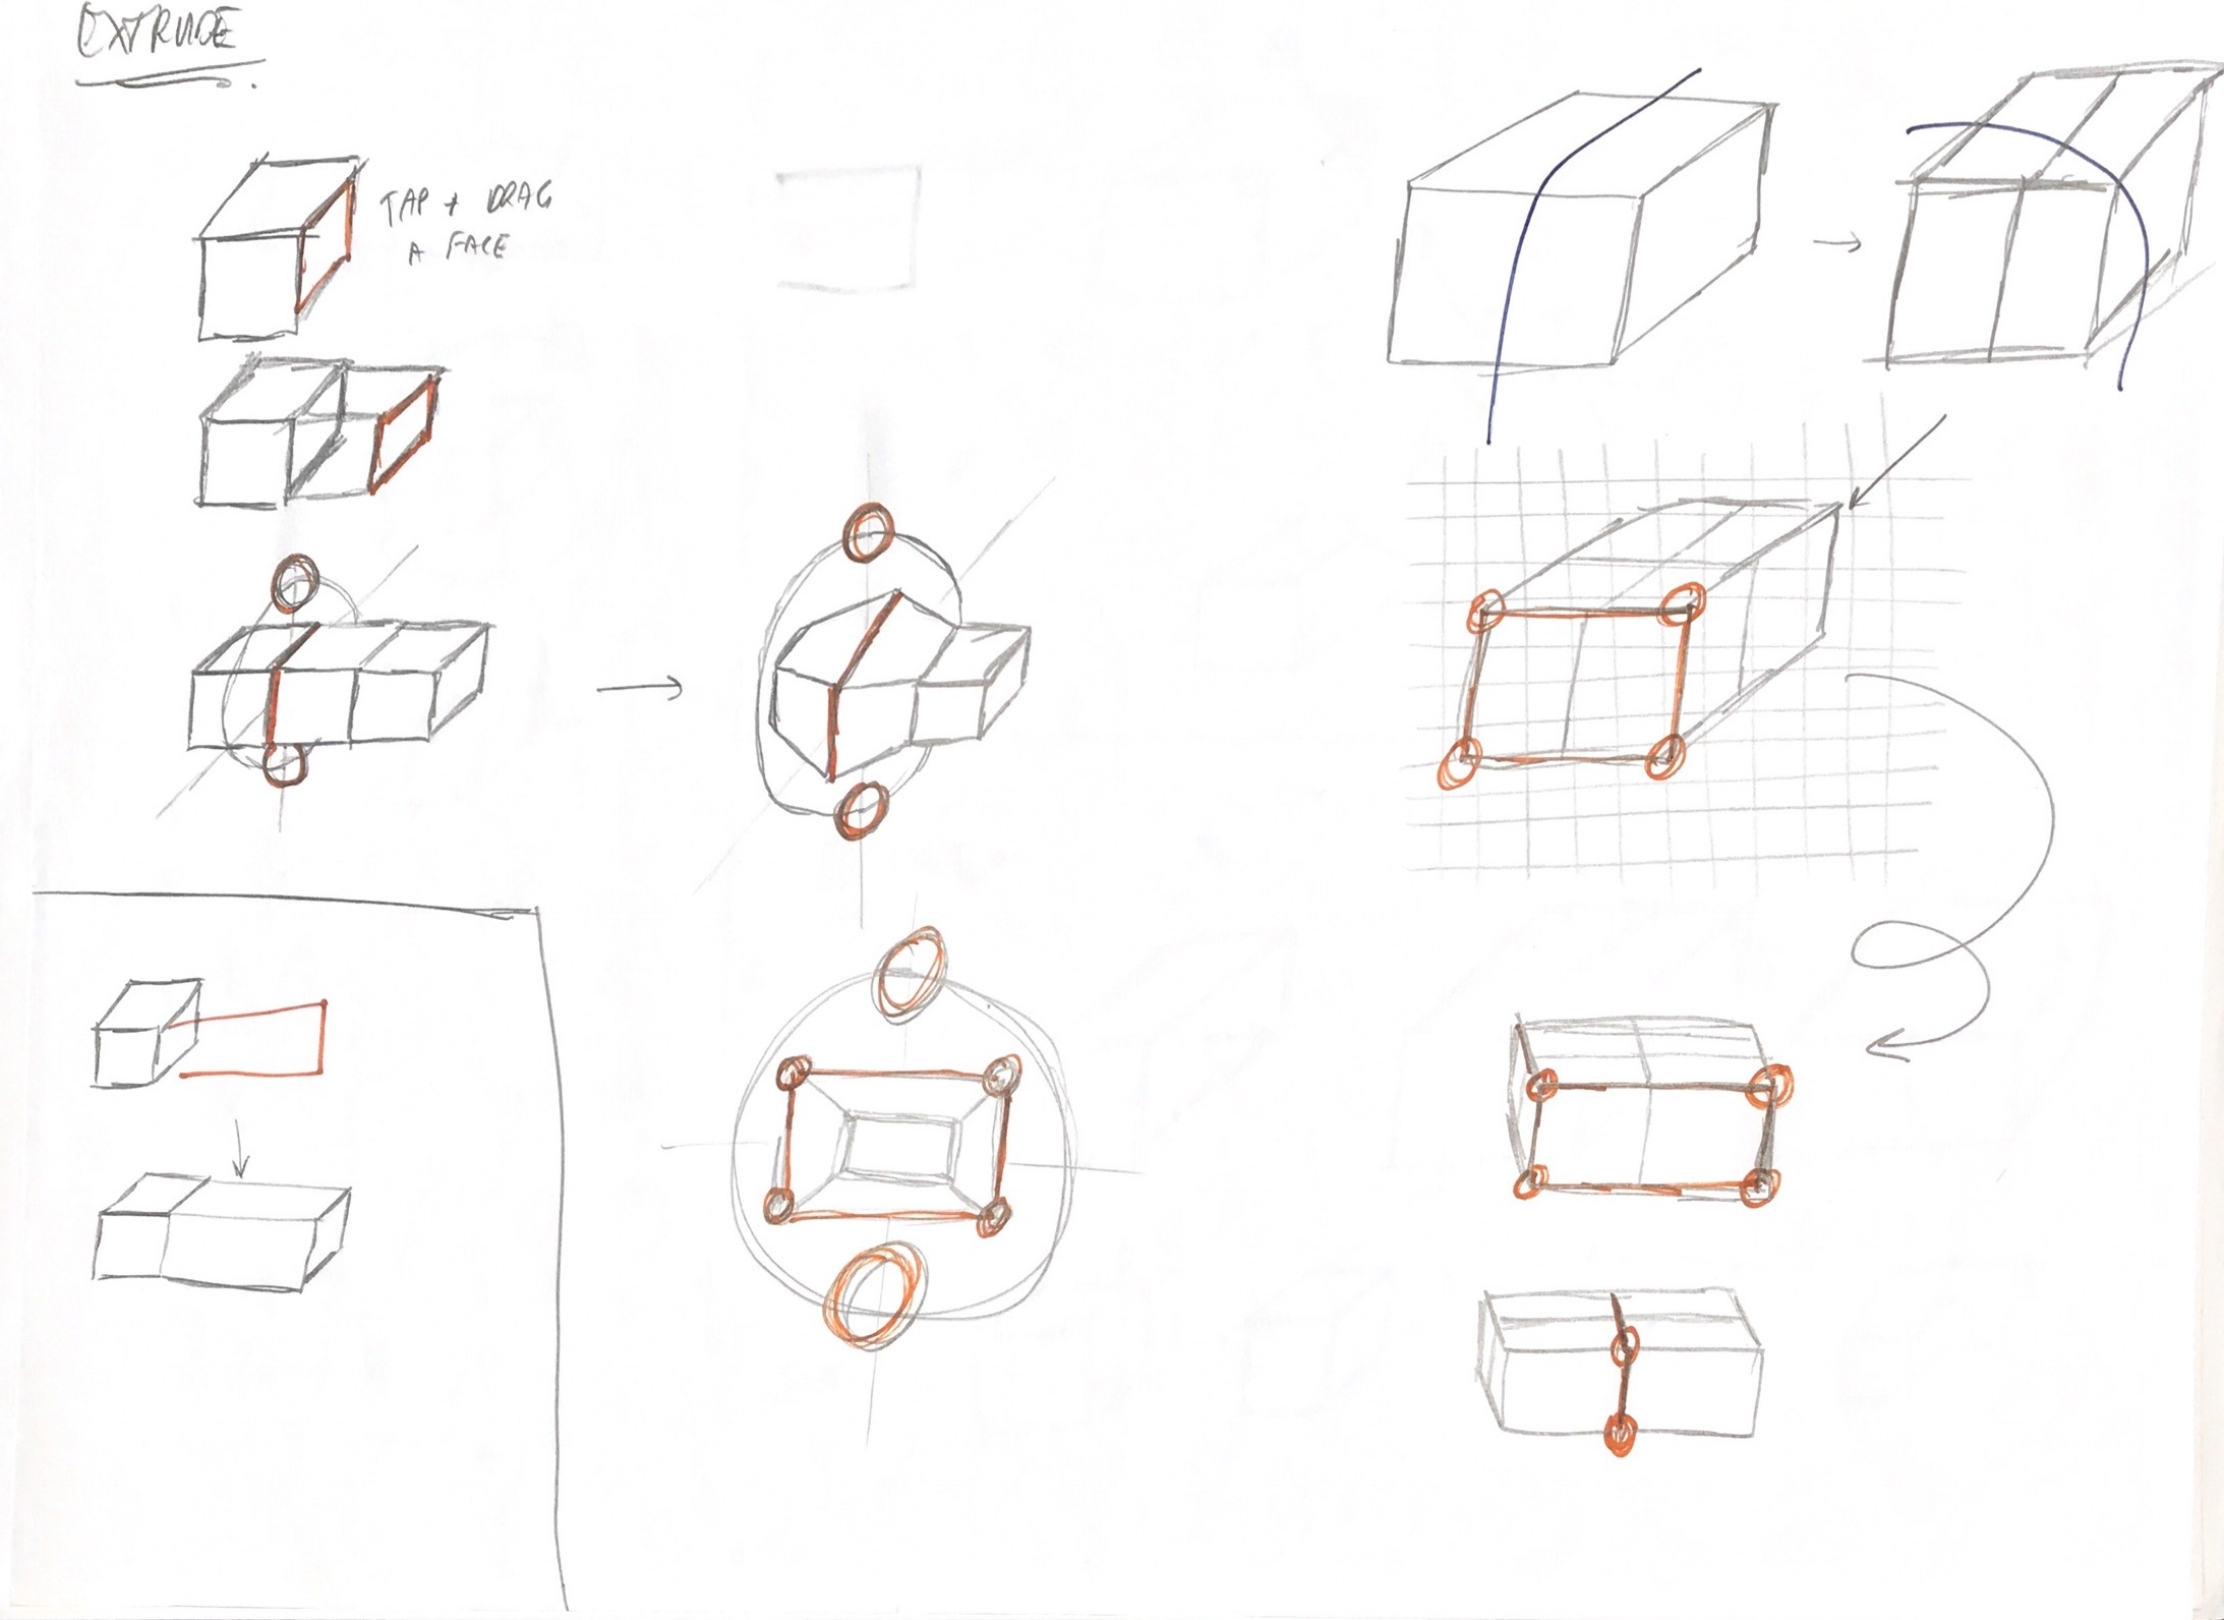
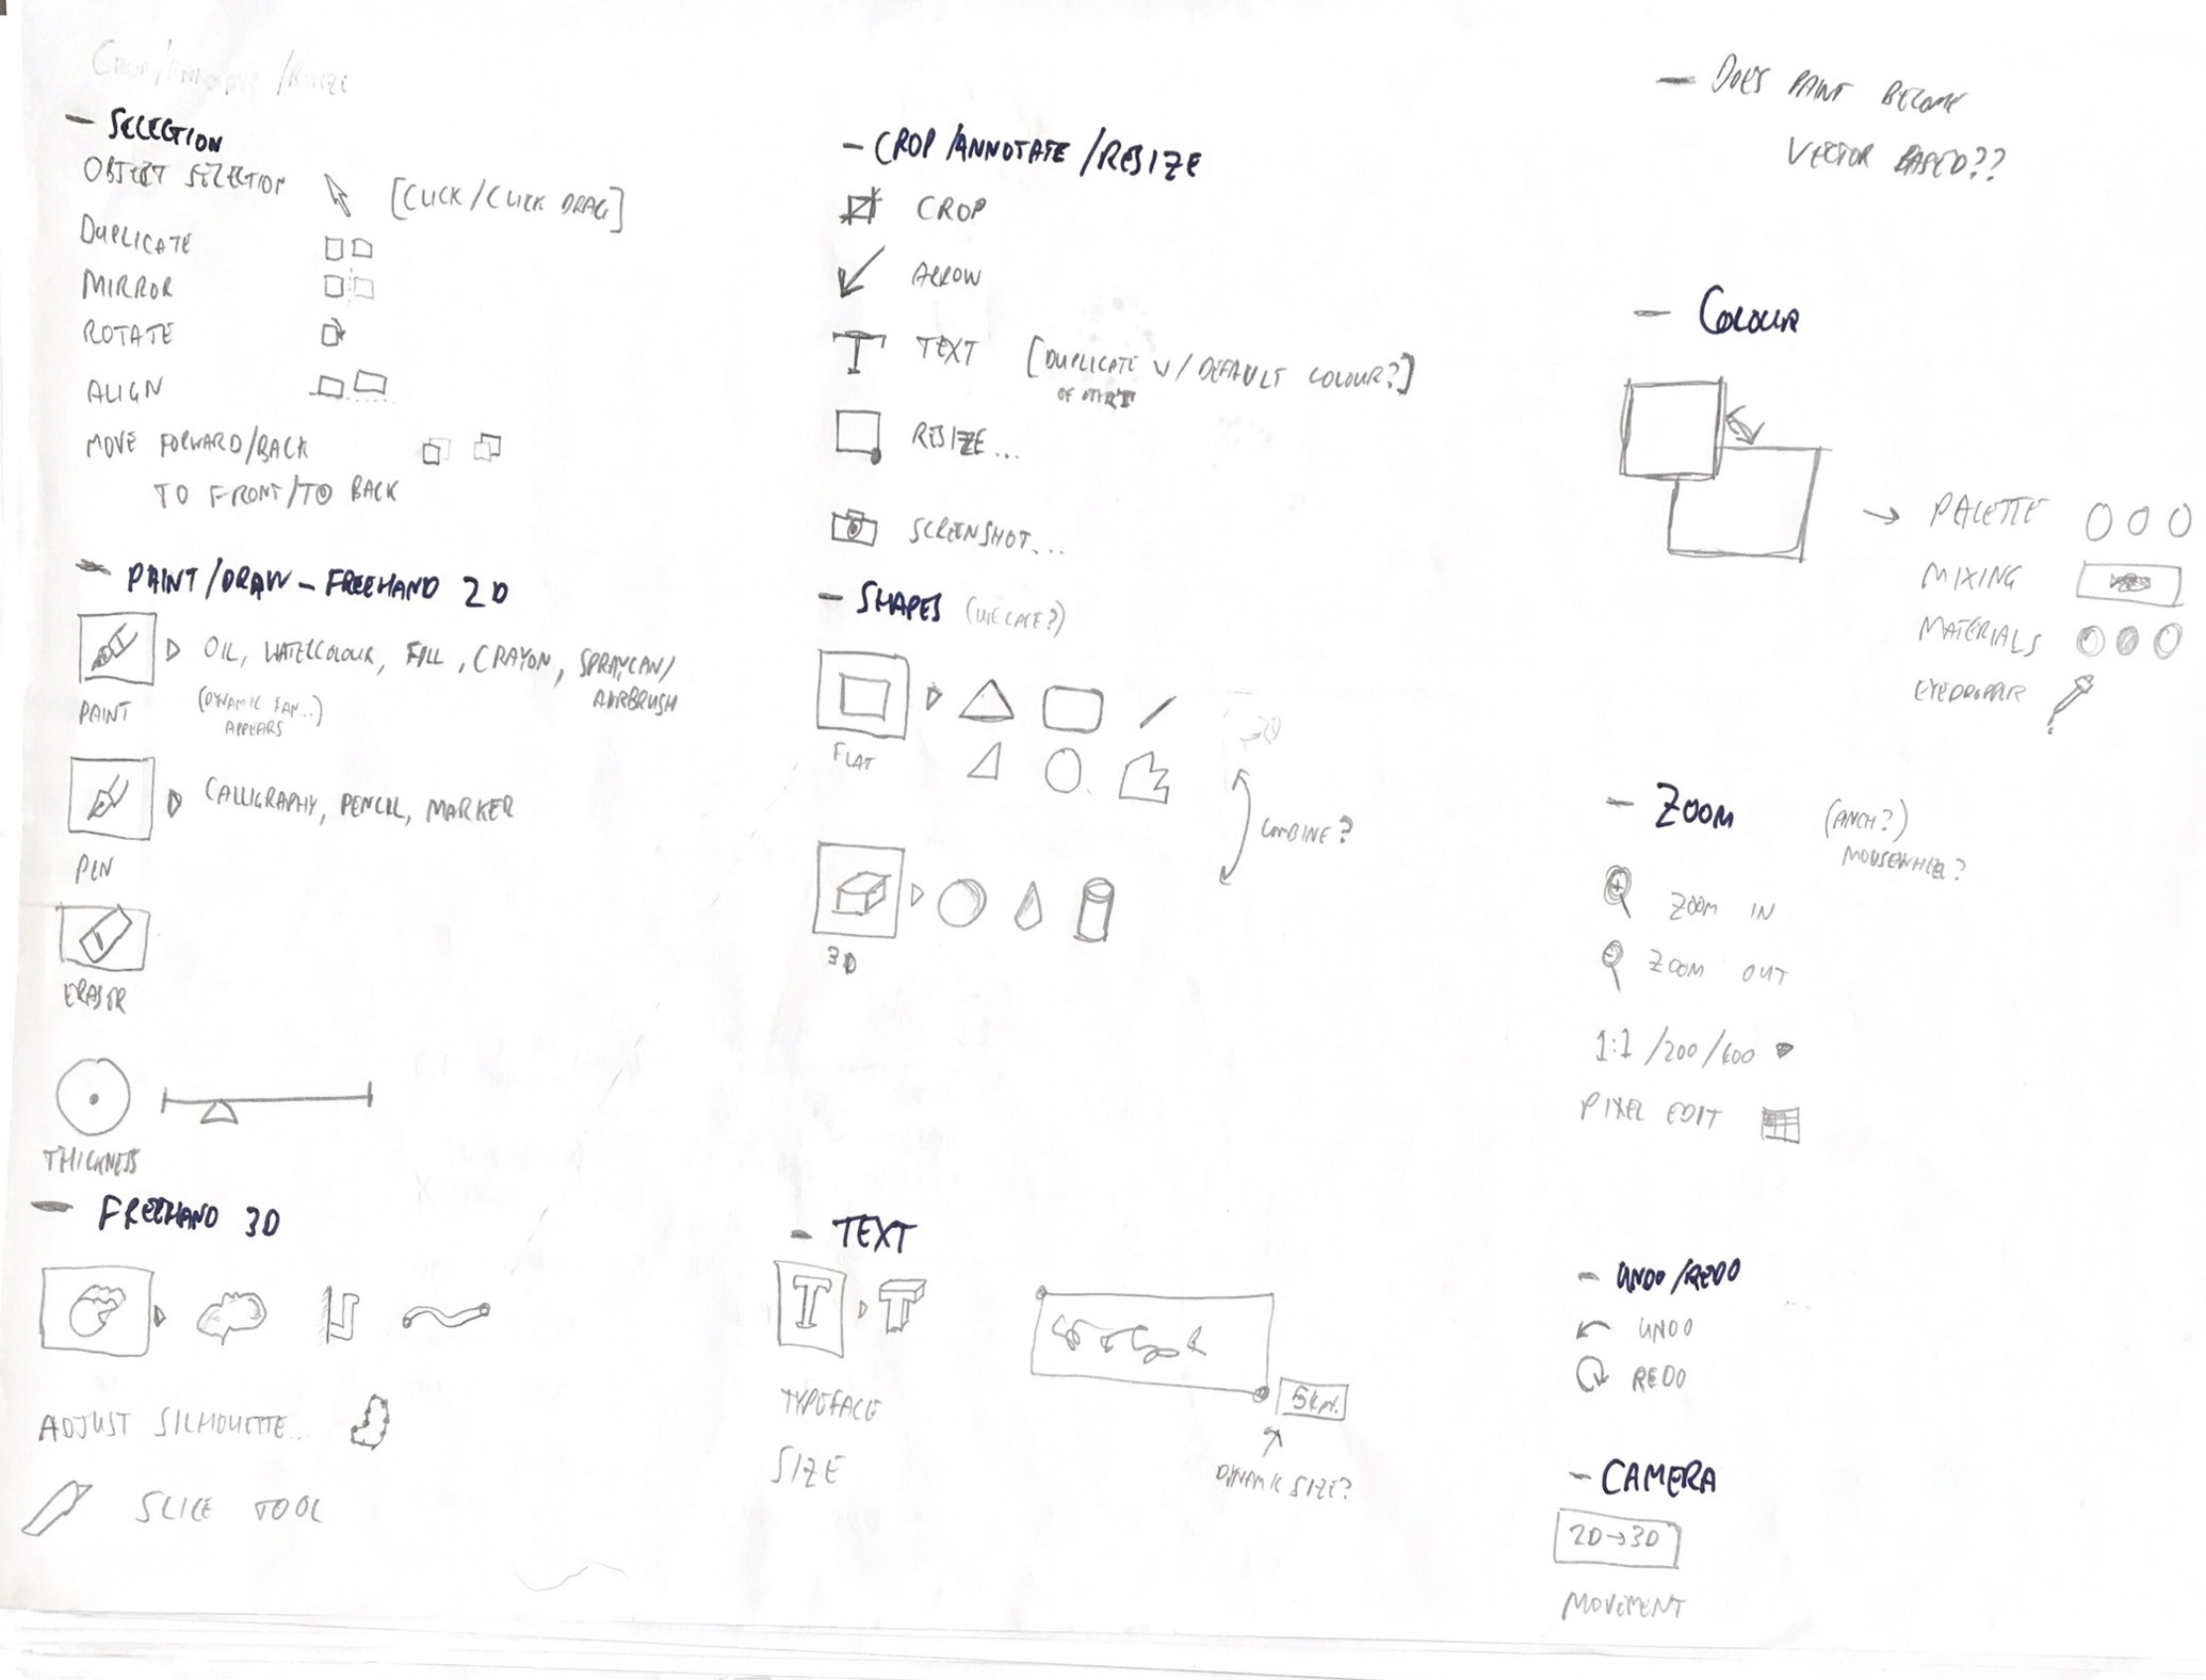
Sketching / ideation
Throughout the project, sketching (both by hand and on tablets) was an important tool to quickly explore ideas.
Since building 3D prototypes is a relatively big investment, we wanted to ensure we'd at least roughed out a first stab at all the important interactions before we tried something out.

UX and UI prototyping & design
I led the UX design of the project as a whole and worked with the product owner to coordinate what we'd try out next.
UX prototyping took place in a Unity prototype version of the app and had a dedicated team of developers and technical artists. We prototyped new and updated 2D functionality (e.g. our new physics based 2D brushes) as well as the majority of our 3D functionality in this prototype. We also used it for user testing.
Unity prototype

UI flow exploration was shared between myself and a colleague and carried out in Sketch and Illustrator respectively. I prototyped some of the more complex UI tool flows in Keynote.
My UI Sketch file

Keynote prototype

Design specifications
I am a strong proponent of a low documentation lean approach and worked closely with the development team every day.
Sometimes however, the complexity of many of the app's interactions plus the need to enumerate states for multiple screen sizes, form factors, accessibility settings and interaction modes did lead to the need for detailed documentation.
The team specifications notebook
User testing
User testing was carried out primarily with our Unity prototype and occasionally with Keynote flows.
I organised and scripted all our early test sessions and collaborated with a full time UX researcher once we brought one on board. I was present for all our test sessions and was the conduit for feedback to the product owner.
Some of our early test feedback

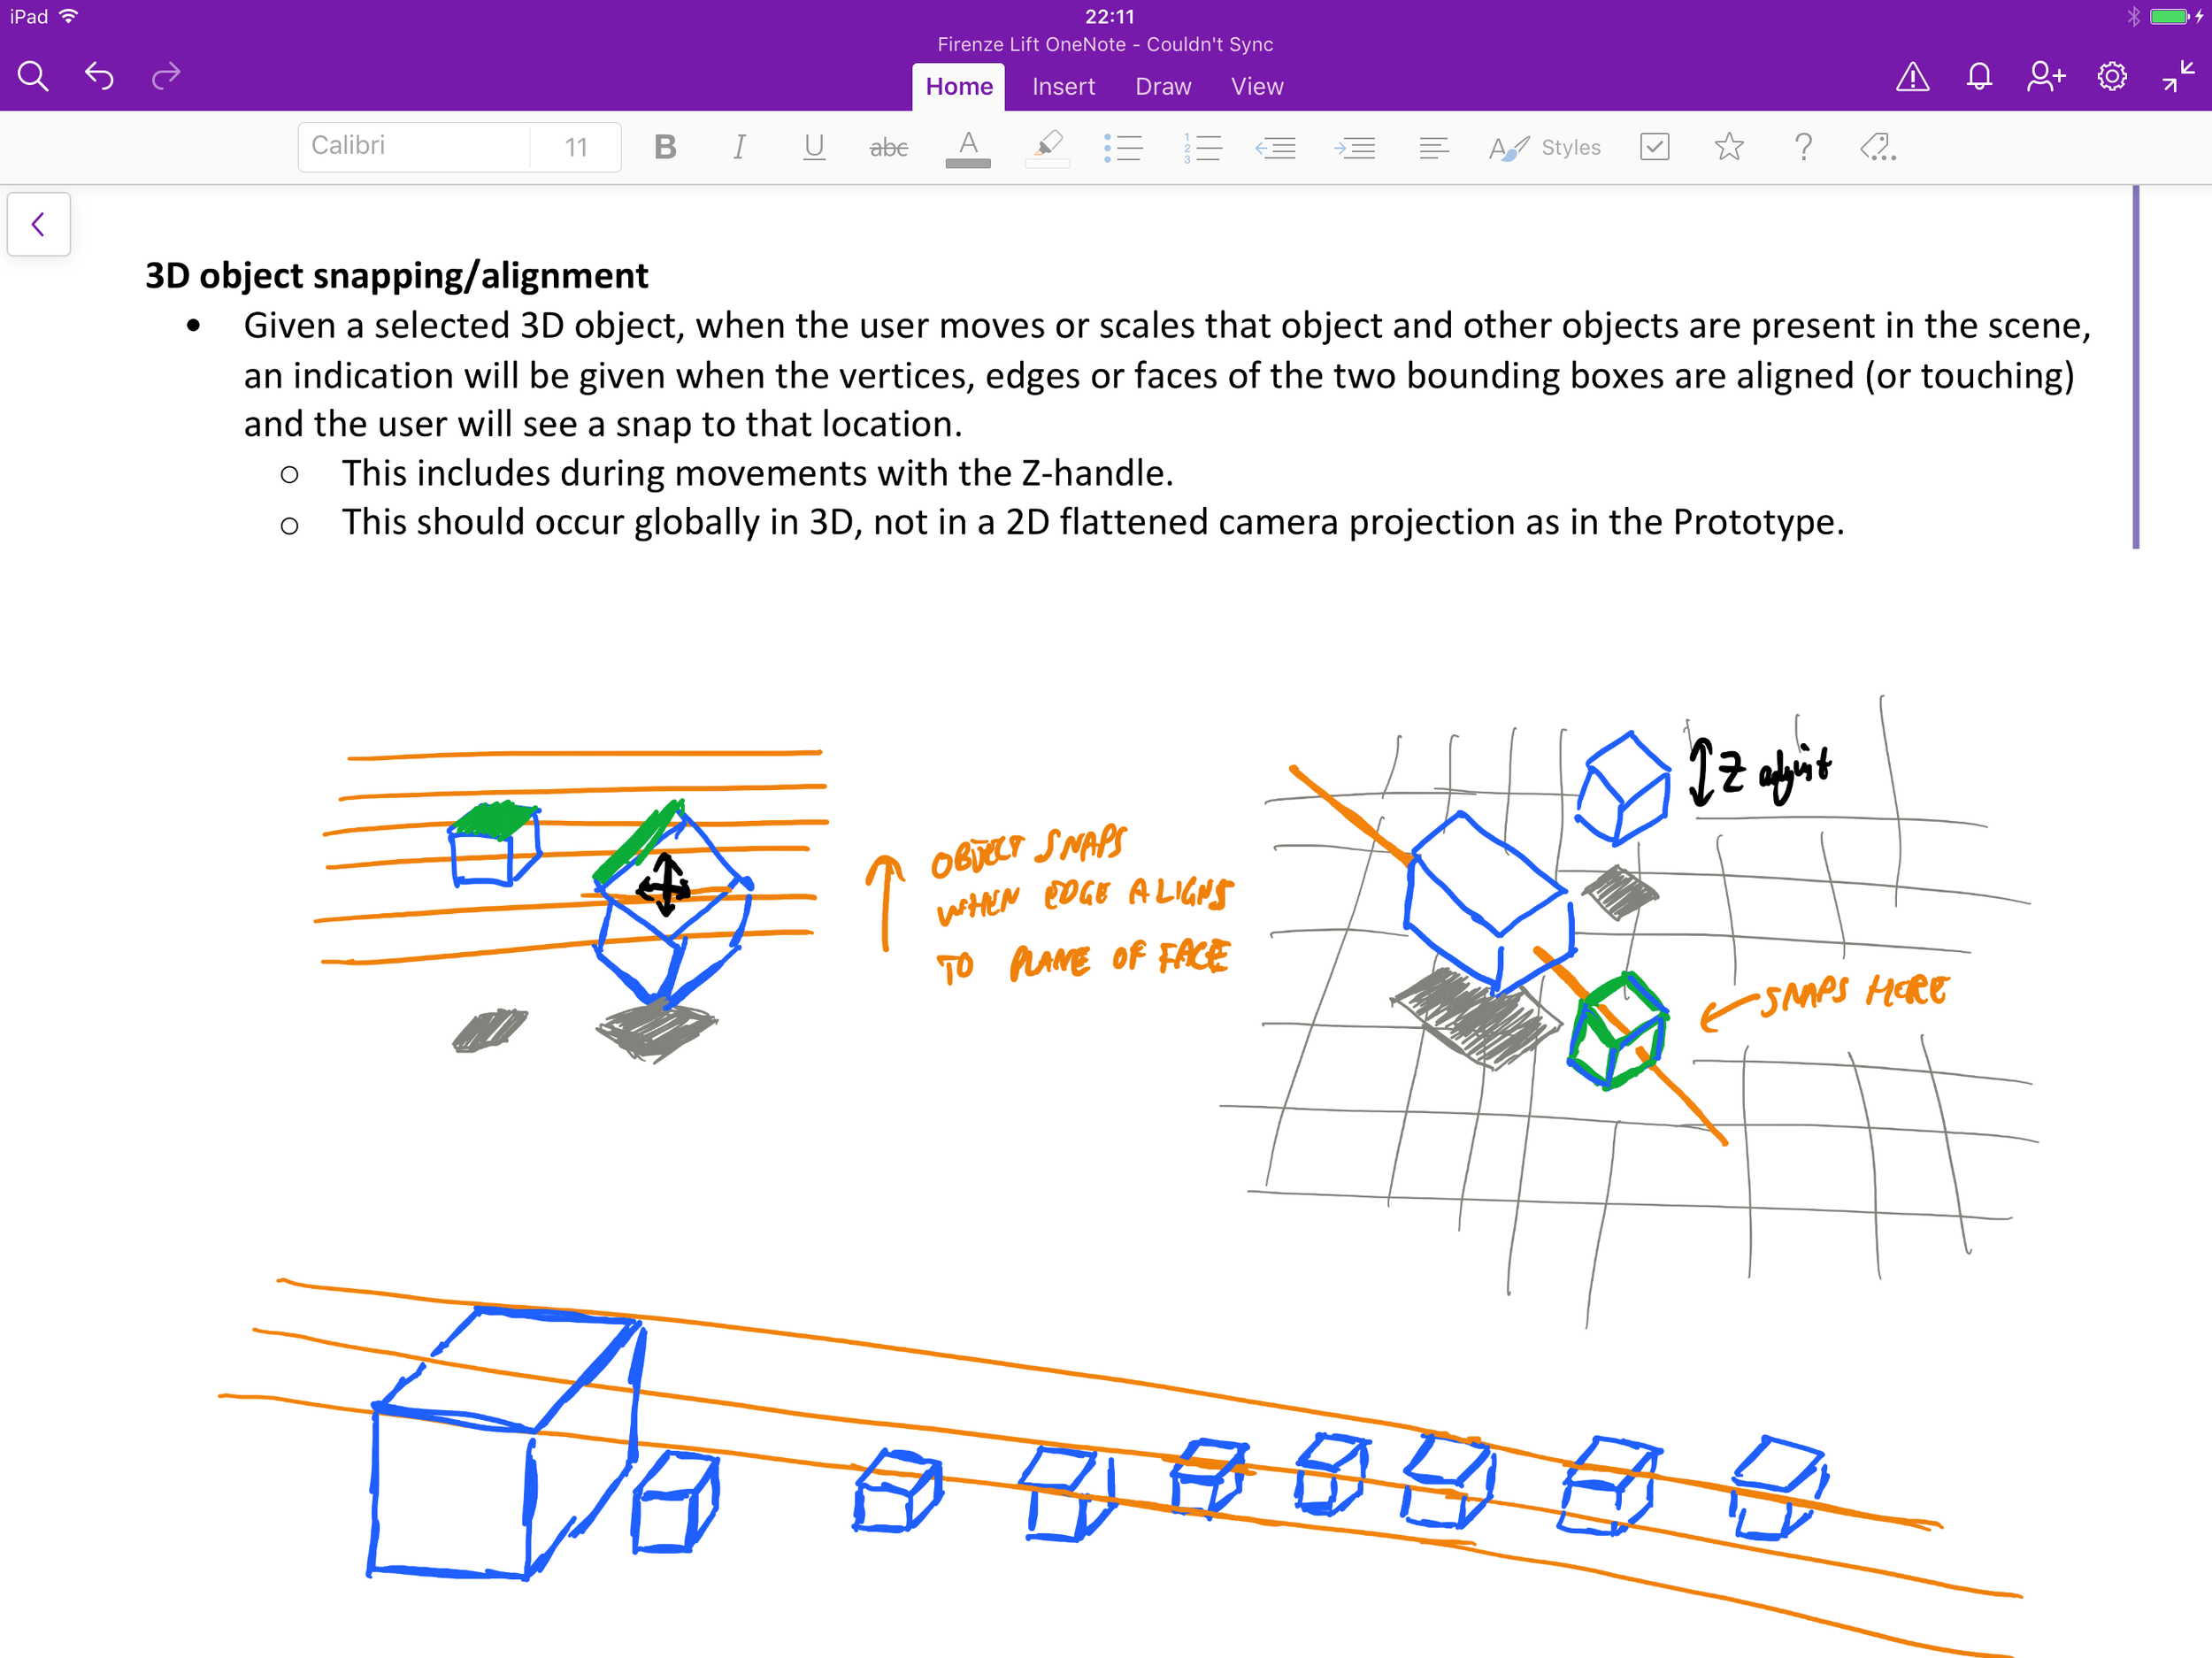
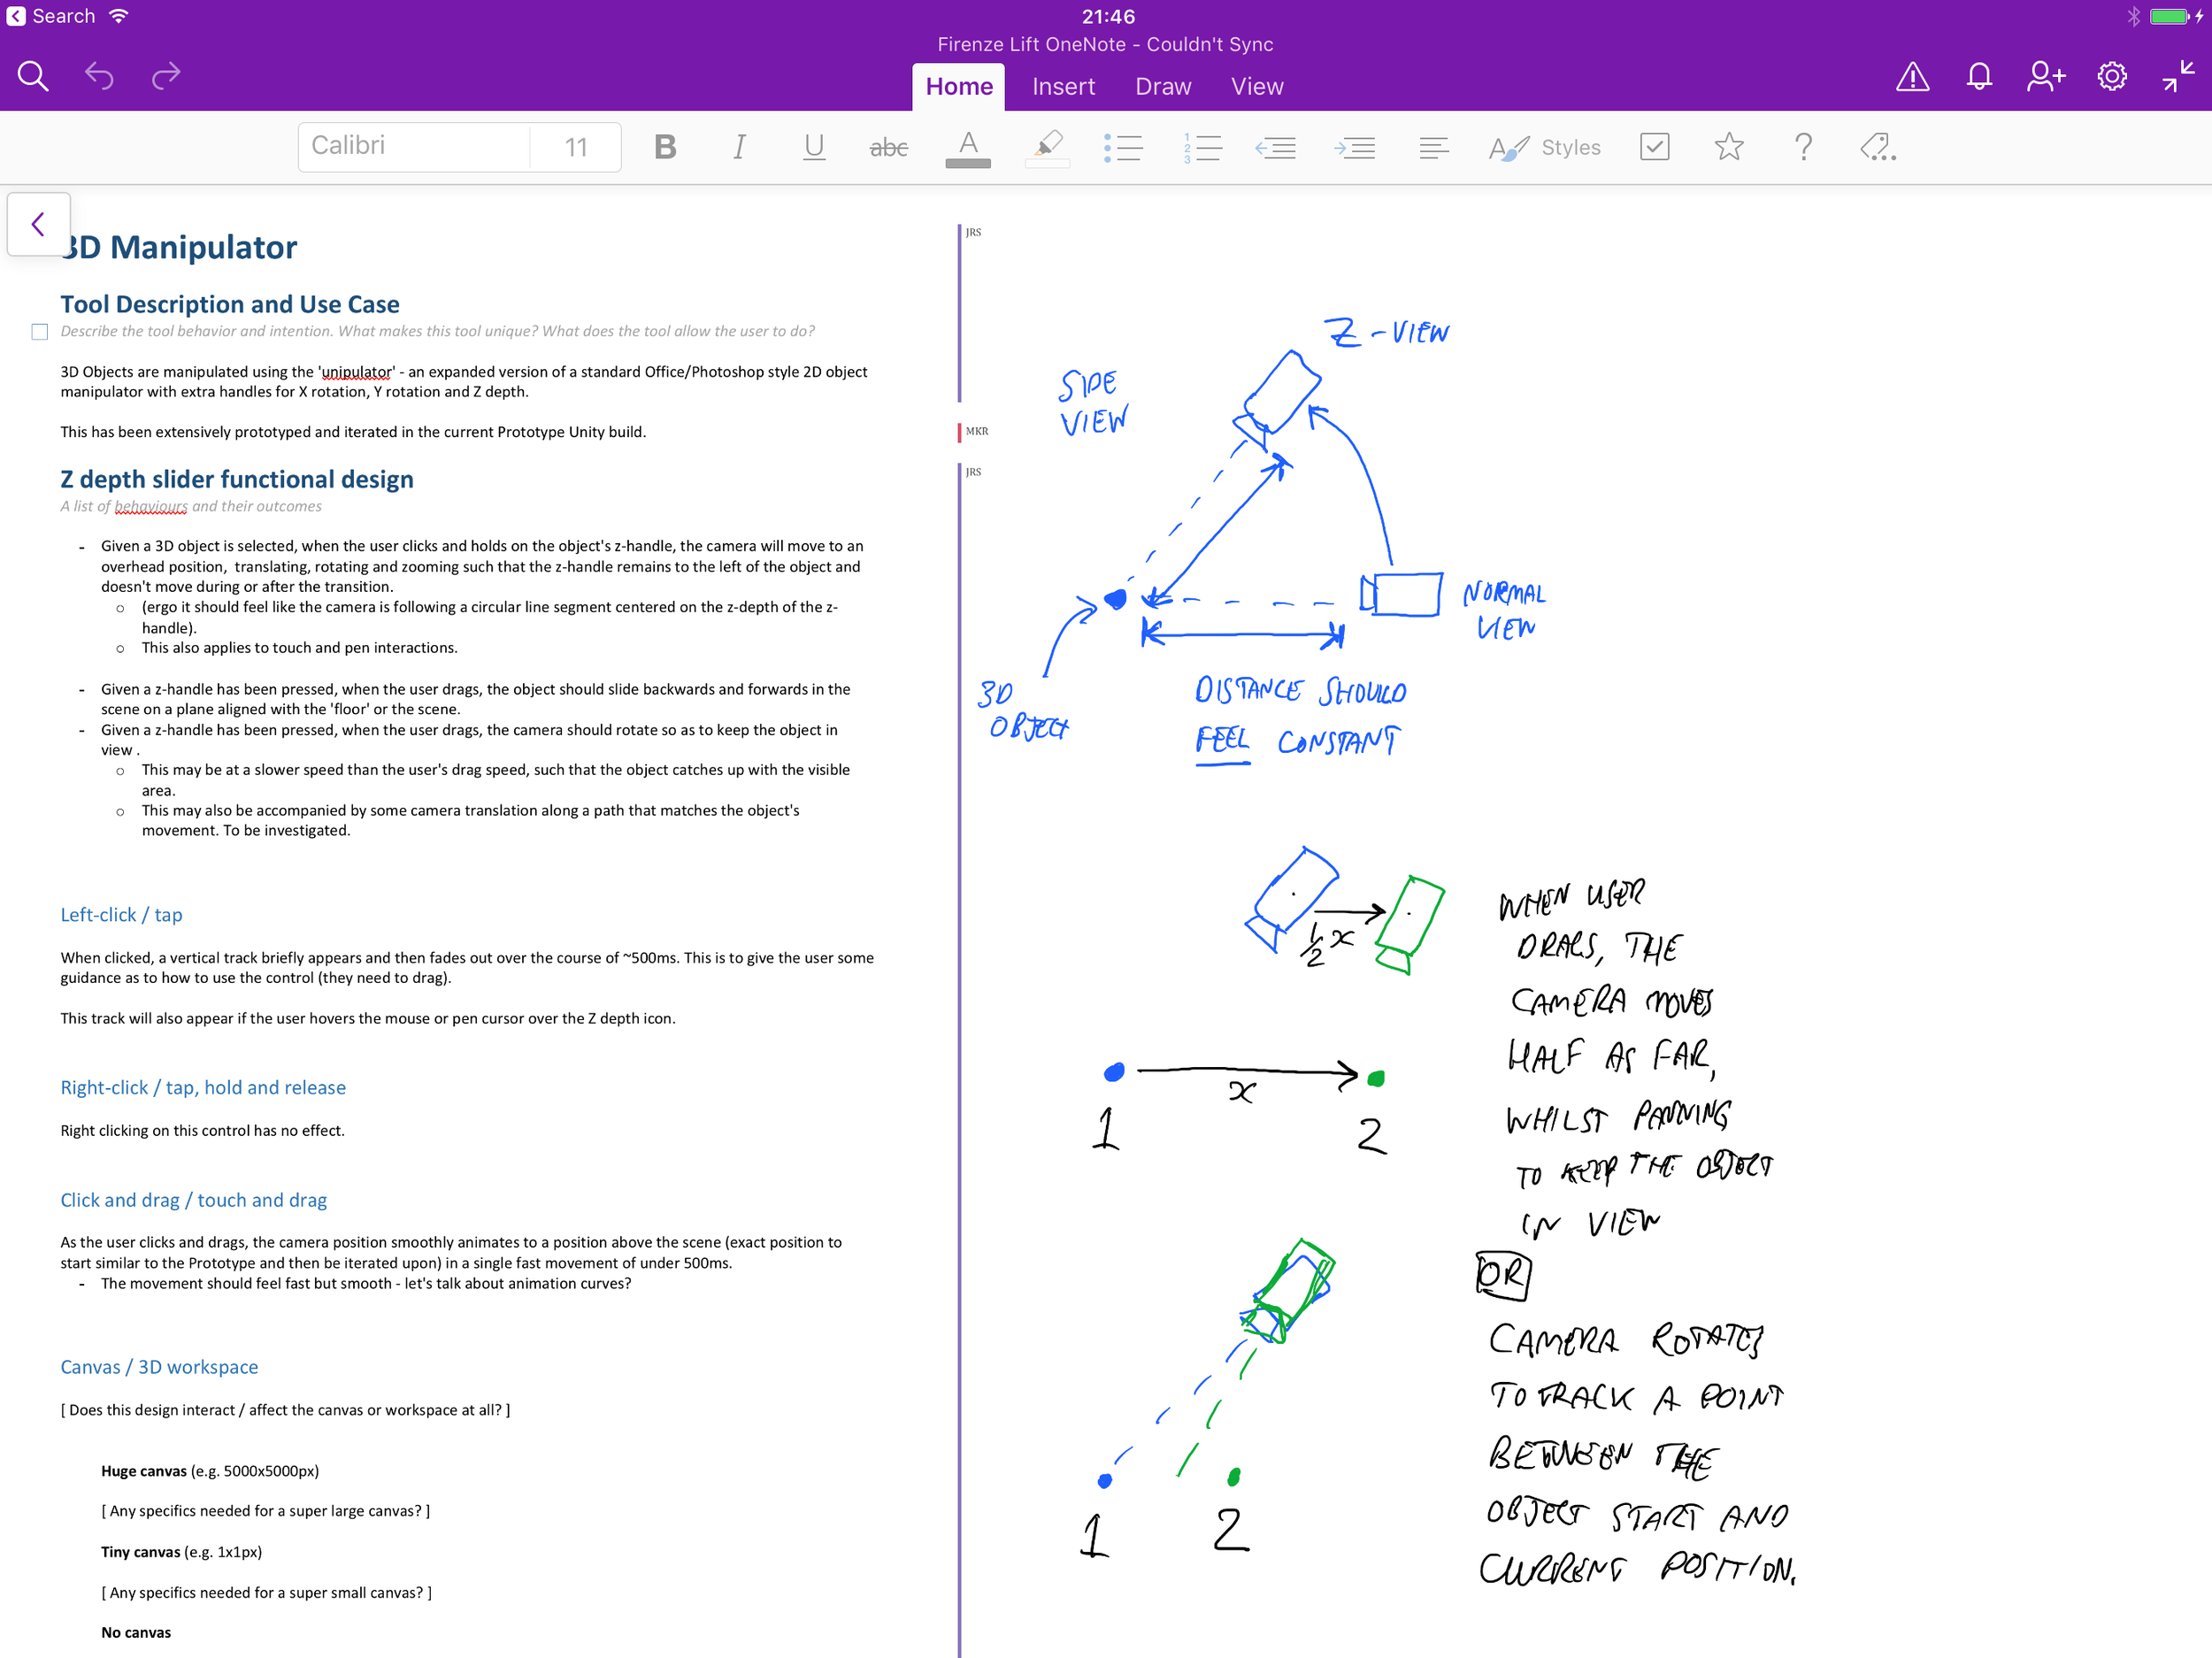
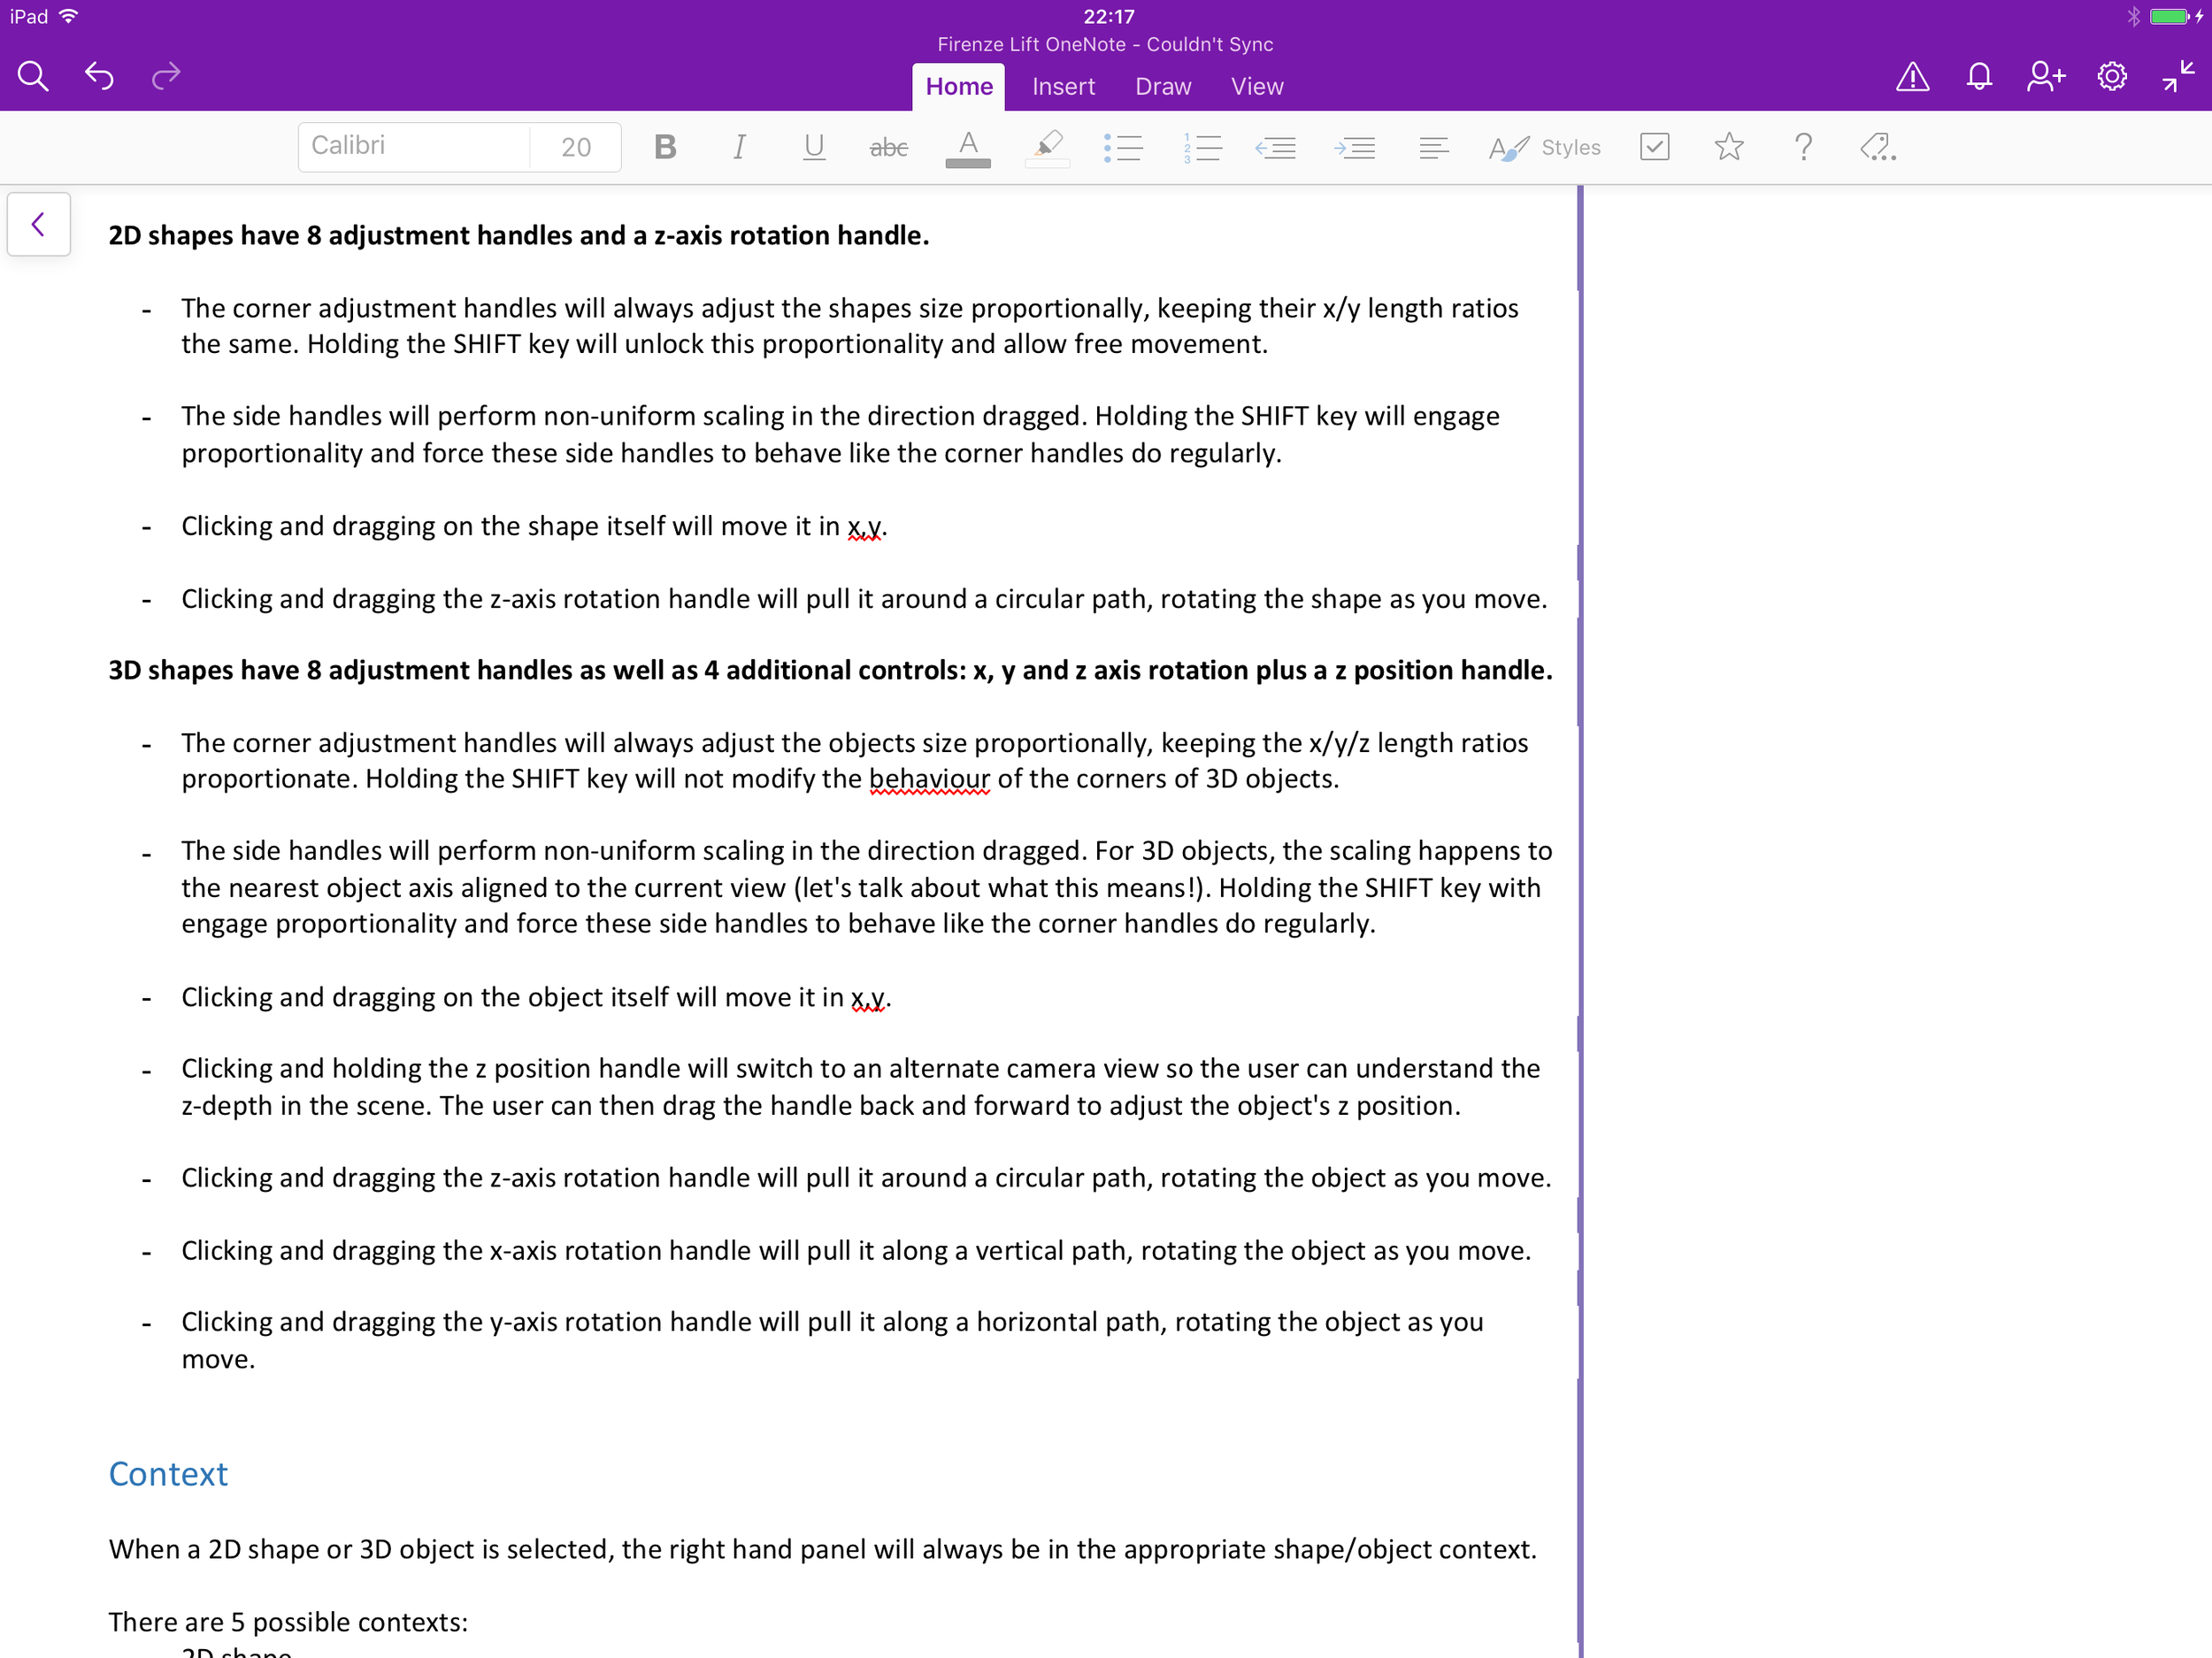
Deep dive: the unipulator
Once the team had decided on a fixed camera approach, we needed to invent a way for users to manipulate objects in 3D space. Over time, our name for this multi-fuctional UI element became the unipulator - one UI element to rule them all.
The number of operations we needed to support was daunting.
In a regular 2D creation app, object UIs tend to support:
x and y-axis scaling
x and y-axis positioning
z-axis rotation

In a 3D creation app, support is also potentially needed for:
z-axis scaling
x and y-axis rotation
z-axis positioning

Almost double the number of functions.
Splitting out these controls into functional modes dedicated to positioning, rotation and scaling is a common approach in other apps. This avoids overburdening the UI, but we felt continual mode switching would require too much cognitive effort. It also becomes a continual interruption to the creative flow state we wanted our users to get into, where consciously worrying about the tools disappears.
Instead we wondered if we could fit all the functions on a single unified set controls that were simple enough not to intimidate but intuitive enough that we wouldn't need to train most users how they worked.
Orbit options
One rotation solution we experimented with was an orbit control that combined the x and y-axis rotation in a single UI element that could be dragged in two dimensions. We user tested this against split x and y slider controls.

It turned out that the combined tool felt imprecise and users usually only intended to rotate an object around one axis at a time anyway.
In addition, all of the other new controls only moved in one dimension so doubling up here was inconsistent.
In the end we shipped with the split controls but re-used the orbit to allow users to rotate their objects whilst they painted them. It fit here perfectly: we throw away their movements once they finish (so precision is less important) and it meant we only needed a single on canvas element present during painting where clearly seeing the object is paramount.
Keep it simple, stupid
Another important element to consider was visual complexity. Even though the x and y-axis rotation controls are conceptually sliders, we found that visualising them this way was too daunting because it added a 3rd visually distinct control type around each object.
You can see this in some of my early UI explorations below.

Skew-morphism
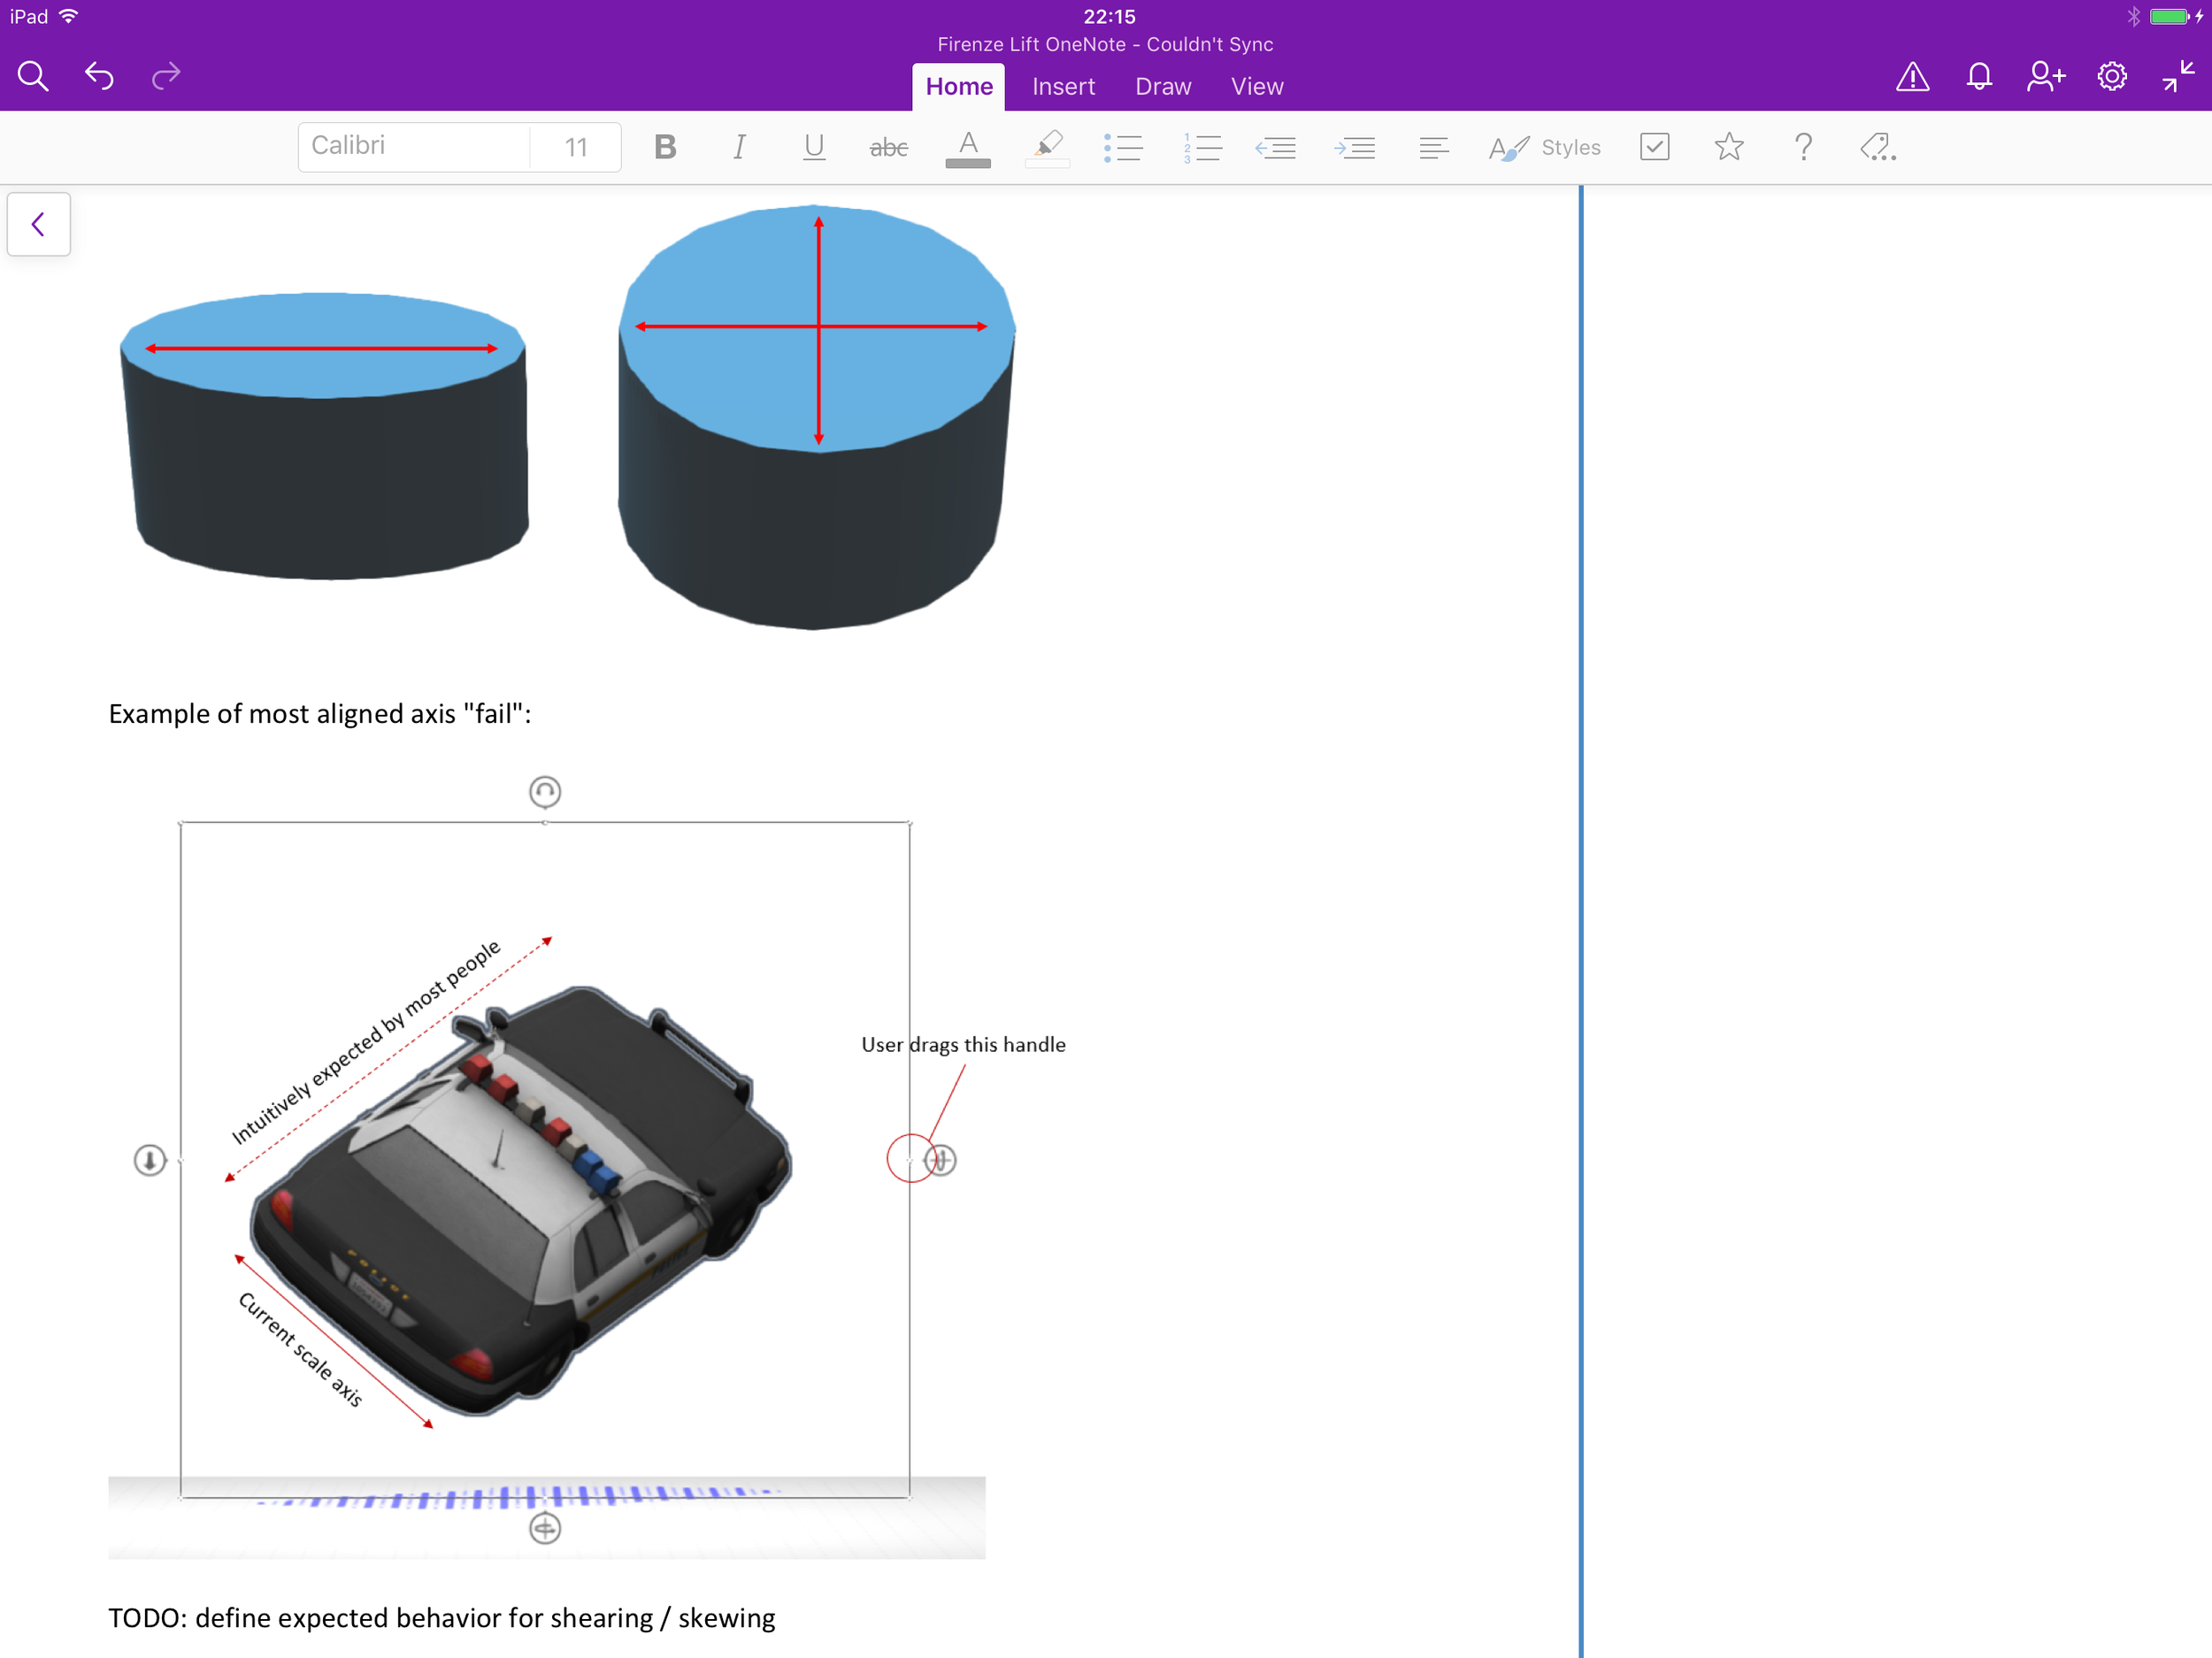
In addition to the above visual work there were many UX design complexities to deal with when designing the behaviours of the unipulator.
For example, when a cube is tilted through its x or y axis (i.e. not square on to the screen), and it's then scaled using the x axis handle, what happens?
Scale it as it looks in screen space, causing it to skew into a rhomboid?
Maintain its shape and scale on one of the axes in object space? Which one?

Of course, the right answer is not to skew, but which axis do you pick? What happens when you group multiple shapes, all at different angles together and scale them? Some have to skew, so which do you prioritise to maintain their shape?
This and many other questions were answered through extensive prototyping, testing and iteration.
Solved?

This is it!
A single combined selection and manipulation control that allowed movement in x/y/z, rotation around x/y/z and scaling in x/y.
The only thing that didn't make it was was depth scaling (i.e. scaling in z). Depth scaling with a fixed camera proved confusing, since the user can't really see the impact of their adjustments in the default view. To change this dimension, the user rotates the object and uses the x and y scaling controls as needed.
In use, 3D object manipulation with the unipulator seems so simple and obvious that it's surprising there could even be any other way to do it.
That's when you know you've nailed it.
Example builds!
Check out some cool models built using Paint 3D:
Platform
Microsoft Windows 10
Deliverables
Sketches
Prototypes
Interaction design
Design specifications